How to Create Labels in Word: A Practical Guide for 2025
Creating labels in Word is a straightforward process that can save you time and enhance your organization. Whether you’re preparing addresses for mailers or designing professional labels for products, this guide will walk you through the steps and provide tips for effective labels in Microsoft Word. From **customizing labels** to using **Word label templates**, you’ll learn how to create address labels efficiently and professionally.
Getting Started with Word Label Creation
Before diving into how to create labels in Word, it’s essential to understand the fundamentals of the **Word label creation** process. Labels are used for various purposes, ranging from mailing to organizing and branding. The first step involves selecting the correct **label sizes in Word**, which can vary based on the type of label paper you’re using. You can find many different options available in the “Labels” section under the “Mailings” tab, giving you an array of choices, including popular formats like Avery labels.
Choosing the Right Label Templates
**Word label templates** make it easy to format your labels quickly. Microsoft Word has built-in templates that you can customize based on your needs. To begin, navigate to the “Mailings” tab and select “Labels.” Click on “Options” to choose a template that matches the dimensions of your label sheet. Using Avery’s products? They have many templates designed specifically for their products, ensuring seamless label printing. For custom sizing, you can always opt for creating a new label format by specifying the dimensions.
Utilizing the Word Label Wizard
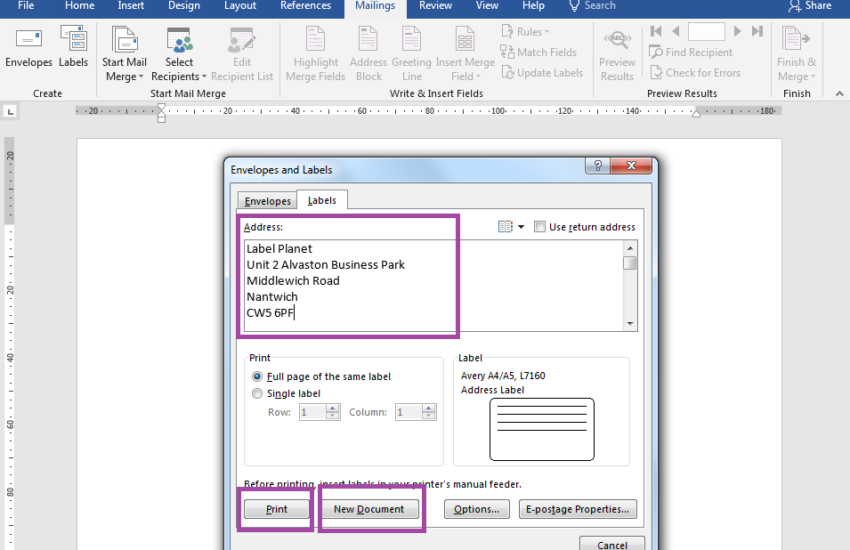
The **Word label wizard** simplifies the label creation process by walking you through each step. You can access it through the “Mailings” tab, where you can select “Labels” and then “New Document.” The wizard allows you to input your data directly or utilize an address list from Excel, making it much easier to print multiple labels in one go. By employing this feature, you not only save time but also ensure uniformity across all labels, making them look more professional.
Customizing Your Labels
To create custom labels, you’ll want to utilize **label formatting in Word**. This includes changing fonts, colors, and adding images or logos. Select your labels from the label types presented after choosing a template. Use the formatting tools in the Home tab to adjust text attributes. Want a unique label design? Experiment with different font sizes, alignment, and styles until you reach your desired look. You can also import graphics and use **DIY labels in Word** for a personal touch.
Printing Labels Efficiently
Once you’ve crafted the perfect design for your labels, the next step is printing. To ensure you have a successful print job, you’ll need to tackle **label printing setup in Word**. Proper setup is crucial to prevent misalignment. Make sure to select the right printer settings that correspond with the label paper you’re using. Detailed instructions should be provided on the packaging of your label sheets.
Optimal Printer Settings for Labels
When it comes to **print labels in Word**, adjusting your printer settings is vital. Make sure to select the correct paper size and type in the printer options. Generally, you would select a “Label” or “Heavy Paper” option to prevent jamming and ensure the labels stick correctly. Additionally, ensure that your ink levels are adequate to avoid fading or smudging, as these could affect the professional look of your **Word mailing labels**.
Conducting Test Prints
Before you proceed with the bulk printing of your custom labels, it’s wise to conduct a test print. Use a plain sheet of paper to see if the alignment is correct. This step allows you to catch any issues before utilizing your label sheets. After confirming everything looks perfect, load your label paper into the printer, ensuring it matches the settings you selected previously. By doing so, you maximize the chances of achieving **label printing success in Word**.
Exploring Advanced Label Design Techniques
true to its reputation for versatility, Word also offers capabilities that cater to advanced **label design techniques**. If you’re looking to stand out, consider going beyond the standard address labels for a more eye-catching design that represents your brand or personal touch. This section explores some engaging methods and customizations you can employ.
Using Graphics and Logos in Label Design
Incorporating graphics and logos can enhance your **labels in Microsoft Word** significantly. Use the “Insert” tab to add images or clip art that represents your brand. Ensure the image quality is high to prevent pixelation when printed. Placing an engaging logo can turn a simple label into a professional branding tool, enhancing your marketing efforts. Make sure to resize pictures appropriately and test how the labels print with these images included for visual impact.
Creating Stickers and Specialty Labels
For those inclined towards creativity, Word is also a great tool for **creating stickers in Word**. Whether you want to design fun labels for gifts, or unique product stickers, your creativity sets the limit. A blank label template allows you to unleash your imagination. Combine text with fun graphics, and consider using varying shapes and sizes to make your products pop in the marketplace.
Integrating Barcodes for Business Use
If you are looking for a more operational approach, adding barcodes to your **professional labels in Word** can streamline inventory management. By utilizing barcode label settings available in Word, you can integrate product codes directly into your designs. This feature not only enhances product tracking but also adds an aspect of professionalism to your packaging. There are also third-party label design software options that can integrate directly to create barcodes effortlessly.
Final Tips for Successful Label Creation
Creating effective labels in Word doesn’t just end with printing; follow these final tips to elevate your label-making experience. Reflect on your audience’s needs, and ensure that your labels convey the message clearly and attractively. A good label not only provides information but also establishes a professional impression.
Understand Your Audience
Take into account who will be seeing your labels. Are they clients, customers, or maybe individuals attending an event? Tailor your designs to cater to their interests and expectations. For example, a label for a corporate event may need to exude professionalism, whereas a birthday party label can be creative and colorful. Understanding who you are designing for promotes better engagement with your labels.
Experiment and Iterate
Your first attempt may not be the last! Consider using a variety of styles and formats. Experiment with colors, fonts, and formats to find the best designs that resonate with your audience. Keep track of feedback and use it for further iterations. This practice not only enhances the quality and effectiveness of your labels but also improves your overall design skills over time.
Stay Updated with Trends
Label design trends may evolve, so actively stay updated on industry standards, new tools, and innovations in **label design software**. Look out for inspiration in creative communities or design blogs, which can provide you with fresh ideas for your label printing projects in Word.
Key Takeaways
- Utilizing Word’s built-in templates can streamline the label creation process.
- Always ensure proper printer settings to guarantee high-quality labels.
- Regularly experiment with different design options to enhance creativity.
- Innovate your label designs to cater to your target audience.
FAQ
1. How do I adjust label sizes in Word?
To adjust label sizes in Word, go to the “Mailings” tab, click “Labels,” and then “Options.” Here, you can choose from standard sizes or create a custom size by specifying the dimensions. This flexibility allows for a perfect fit with your label sheets.
2. Can I use Avery labels in Word?
Yes! Word is optimized for **using Avery labels** and provides templates specifically designed for them. Simply select “Labels” under the “Mailings” tab, choose Avery, and pick the corresponding template for quick and accurate printing.
3. What software can I use for complex label design?
If you’re looking for specialized design options, consider label design software like Adobe Illustrator or Canva, which offers more creative capabilities. These allow you to integrate advanced graphics and create intricate designs beyond the standard Word features.
4. How do I automate label creation in Word?
To automate label creation, use Word’s mail merge feature by linking to an Excel file containing your data. This allows you to efficiently generate personalized labels for mass printing, which is especially useful for events or marketing campaigns.
5. What type of labels can I create in Word?
You can create various types of labels in Word, including address labels, product labels, shipping labels, and even stickers. Customize these based on the purpose and audience to ensure effectiveness.