How to Properly Connect Roku to TV with HDMI for an Effortless Streaming Experience in 2025
Setting up your Roku device for streaming can be a straightforward process if you have the right guidelines. In this guide, we will explore the best practices and steps for how to connect Roku to TV using HDMI for an optimal streaming experience in 2025. With the increase in content and services, mastering your Roku setup guide can significantly enhance your viewing enjoyment. Let’s dive into the essentials of this process.
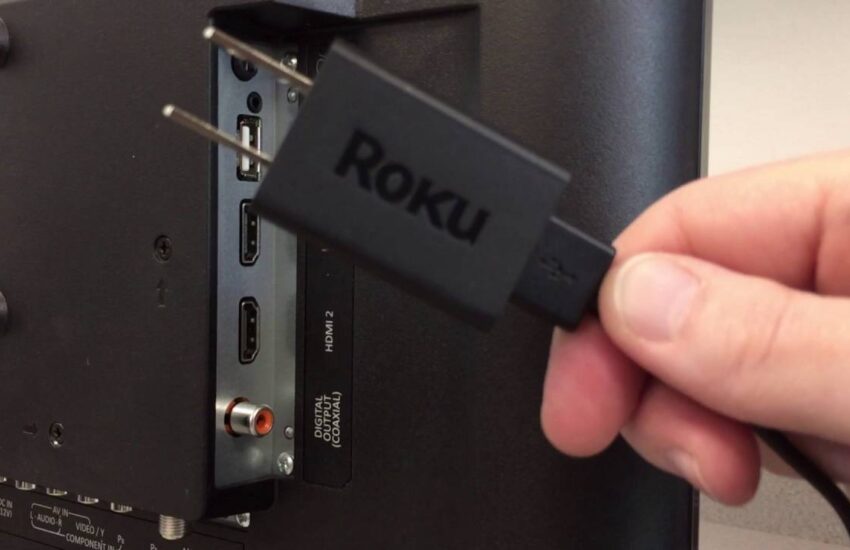
Understanding the HDMI Connection Roku Uses
To achieve a seamless HDMI connection with Roku, it’s crucial to understand how HDMI technology works. High Definition Multimedia Interface (HDMI) supports both audio and video, allowing you to use a single cable to connect your Roku streaming device to the television. Most modern TVs come with several HDMI ports, typically located on the back or side of the television. When setting up, it’s important to check that your TV is equipped with HDMI 2.0 or higher for the best results, particularly if you plan on streaming high-definition content.
Step-by-step Guide to Connecting Roku via HDMI
Here’s a step-by-step Roku setup process to get you started. First, ensure you have an HDMI cable in hand, as it’s essential for connecting Roku. Next, plug one end of the HDMI cable into the HDMI port on your Roku device and the other end into an available HDMI port on your TV. Once connected, power on your TV and select the corresponding HDMI input using the using Roku remote. This action allows you to view the Roku home screen.
Verifying HDMI Connection Quality
Once your Roku is connected, it’s vital to verify the HDMI connection. If you’re encountering issues, check if the cable is securely plugged in on both ends and ensure that your TV’s input source is set correctly. Sometimes, simply unplugging the HDMI cable and re-plugging it can resolve common issues. If the problem persists, consider using a different HDMI cable or testing another HDMI port on your television for improved connectivity.
Initial Roku Setup Strategically for Streaming
The initial setup of your Roku streaming device is crucial for an optimal experience. Start by inserting the batteries into your Roku remote and pairing the device by pressing the pairing button located inside the battery compartment. After powering the Roku device, follow the on-screen instructions to connect the device to your Wi-Fi network, which is essential for accessing streaming content.
Configuring Roku Settings and Preferences
Once connected, take a moment to customize your Roku experience by adjusting the optimal Roku settings. Navigate to the settings menu where you can personalize your audio output, change video resolution, and set up parental controls if needed. Don’t forget to set up parental controls if you wish to manage what the kids watch. Such settings are crucial for families wishing to restrict content types, ensuring a safe viewing environment.
Updating Roku Software for Enhanced Features
It is critical to ensure that your Roku is running the latest software version for bug fixes and new features. You can check for updates in the settings menu. Having the latest software will not only improve connectivity and performance but give you access to the latest streaming options on Roku that enrich your overall entertainment experience.
Troubleshooting Roku Connection Issues
Sometimes, despite following all the setup protocols, users may face connection issues. Knowing how to troubleshoot Roku connection problems can save you time. A good first step is to verify that your connecting Roku to smart TV setup is correct and that your Wi-Fi network is functioning well.
Network Troubleshooting Steps
If your Roku becomes unresponsive or you cannot access streaming services, it could be a network-related issue. Start by restarting your router and ensuring you are connected to the correct Wi-Fi network. You can test the signal strength in the Roku settings under the Network section. This can help identify if your internet connection is strong enough for streaming.
Common Fixes for HDMI Issues
HDMI issues can also arise while using Roku. If you encounter a black screen or no audio, check the HDMI compatibility of your TV and Roku device. Ensure that both devices support the same HDMI version, ideally HDMI 2.0 or higher. Replacing older cables with high-quality HDMI cables can sometimes resolve compatibility or performance issues.
Maximizing Your Roku Streaming Experience
With your Roku properly connected and configured, it’s time to focus on maximizing your streaming experience. One way to do this is by exploring the Roku channel store for various entertainment options. You can download popular streaming apps like Netflix, Hulu, and Amazon Prime Video to enhance your content library.
Organizing Your Roku Home Screen
Efficient organization of your channels can transform your navigation experience. You can rearrange the icons on your Roku home screen based on your viewing preferences. Consider grouping similar channels together to make it easy to find what you want quickly.
Exploring Additional Roku Features
Roku devices provide several features that can enhance your streaming enjoyment. Consider using services like Roku’s voice search feature, which allows you to find content via voice commands. Additionally, some Roku devices include screen mirroring options that enable casting from mobile devices, providing you with immense flexibility in how to consume content.
Key Takeaways
- Always check HDMI compatibility and use high-quality cables for the best results.
- Regularly update your Roku system for enhanced performance and access to new features.
- Customize your Roku settings and organize your home screen for a more efficient viewing experience.
- Know troubleshooting steps and common issues to have a smooth streaming experience.
- Explore and utilize the various features Roku offers for enriched entertainment.
FAQ
1. How do I activate my Roku device online?
To activate your Roku device online, simply connect it to your TV and internet, then follow the on-screen prompts. You’ll be asked to link your Roku account, which you can do by visiting the Roku activation page on a mobile device or computer.
2. What should I do if my Roku is not connecting to Wi-Fi?
If your Roku cannot connect to Wi-Fi, check your network settings. Restart your router, ensure that your Roku is within range of the Wi-Fi signal, and verify that you’ve entered the correct Wi-Fi password.
3. How can I change Roku’s display settings?
You can change your Roku’s display settings by navigating to Settings > Display Type. From there, select the resolution that best fits your television to optimize the viewing experience.
4. What are some effective parental controls on Roku?
To set up parental controls on Roku, go to Settings > Parental Controls. You can set a PIN that restricts access to certain channels, ensuring that kids cannot view inappropriate content.
5. How do I add new channels to my Roku device?
Adding new channels to your Roku is straightforward. Access the Roku Channel Store from the home screen, browse or search for the desired channel, and follow the on-screen prompts to add it to your library.
6. Why is my Roku device showing a black screen?
A black screen commonly indicates an HDMI connection issue. Check the HDMI cable connections, make sure the correct input is selected, and verify that the HDMI ports are functioning. If needed, try a different HDMI cable or port.
7. What to do if my Roku remote isn’t working?
If your Roku remote is not functioning correctly, check if the batteries need replacing. If the remote won’t pair, try reinitiating the pairing process by pressing the pairing button found in the battery compartment.