How to Connect Meta Quest 2 to TV: Smart Ways for 2025
The Meta Quest 2 is an incredible virtual reality headset that not only immerses you in gaming but can also display that immersive experience on a larger screen. With so many ways to enhance your VR experience, knowing how to connect Meta Quest 2 to your TV is essential. In this article, we will explore innovative methods and provide a thorough guide on Meta Quest 2 setup and viewing options, making your connection a breeze.
Setting Up Your Meta Quest 2 for TV Connectivity
Before diving into the methods of connecting Meta Quest 2 to smart TV, it’s essential to prepare your headset properly. Ensuring your device is updated and you’ve optimally set up the Meta Quest 2 display settings will make a significant difference. Depending on your TV model, there are various VR system connectivity options to consider, such as HDMI and wireless connections. This section covers preparation for a seamless connection process.
Update Your Meta Quest 2
Keeping your Meta Quest 2 functionality at its best starts with ensuring your headset is updated to the latest software version. Software updates can enhance performance and resolve previous casting issues. To check for updates, simply navigate to Settings -> About in the Meta Quest menu, and if there’s an update available, download and install it. Having the latest software ensures optimal performance during your Meta Quest 2 casting.
Connecting to Your Home Wi-Fi
A stable Wi-Fi connection is crucial when using any wireless display Meta Quest 2 options, such as screen mirroring or casting. Ensure your headset is connected to the same Wi-Fi network as your TV or casting device, such as Chromecast. To connect to Wi-Fi, go to Settings -> Wi-Fi in the Meta Quest 2 menu and select your network. This step ensures smoother **VR content sharing** and minimal lag during casting.
Optimal Video Output Settings
Adjusting the video output settings on your Meta Quest 2 can greatly enhance your Meta Quest 2 visual experience. Navigate to the ‘Devices’ section in settings and choose ‘Video Output’. Adjust the resolution settings based on your TV specs to ensure maximum clarity. If your TV supports higher resolutions such as 4K, ensuring that these settings are updated will optimize your visual experience.
Methods to Connect Meta Quest 2 to Your TV
There are multiple ways to connect your Meta Quest 2 to a TV, each varying in complexity and requirements. The following sections explore methods like HDMI connections, screen mirroring, and wireless casting options. We’ll also cover a step-by-step guide for each method to ensure you confidently display your VR experience on the big screen.
Wired HDMI Connection
For a straightforward connection with minimal latency, using an HDMI cable can be an effective way to directly link your VR headset to a TV. Most modern TVs have HDMI ports available, and by connecting your Meta Quest 2 using a USB-C to HDMI adapter, you can easily output VR content on your TV screen. This method is particularly useful for those who enjoy multiplayer gaming, as it provides an immediate display of gameplay without needing additional configurations.
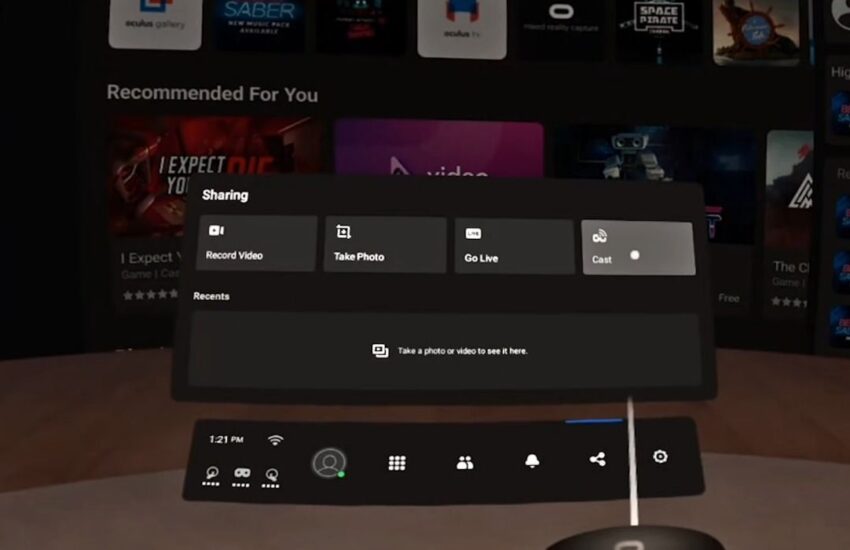
Using Chromecast for Wireless Connectivity
Connecting Meta Quest 2 with Chromecast provides a hassle-free way to mirror your VR display on a compatible TV. Ensure your Chromecast is set up and connected to the same Wi-Fi network as your headset. Open the Meta Quest 2 menu, select ‘Share’, and choose ‘Cast’. Select your Chromecast device to start streaming. This method allows you to enjoy VR gaming while friends and family watch your experiences on the big screen, enhancing social interactions.
Screen Mirroring on Smart TVs
Many smart TVs now come equipped with screen mirroring capabilities. If your television supports this feature, enable it on your TV settings. On Meta Quest 2, access the ‘Share’ menu again and choose ‘Cast’. Your TV should appear as an available device. After connecting, the content from your VR headset plays on your smart TV, allowing for an immersive shared VR experience.
Enhancing Your Meta Quest 2 Display Experience
Connecting your Meta Quest 2 to a TV is just the beginning. To enhance your VR experience further, consider the following setup options and settings. These adjustments can improve gameplay, audio quality, and overall interaction levels while using your VR headset. This section aims to provide practical tips for optimizing the connection quality and usability.
Audio Settings for VR Viewing
Audio plays a pivotal role in the VR experience. When connecting Meta Quest 2 to your TV, ensure sound settings are optimized to prevent latency or audio lag. Access your Meta Quest 2 settings and navigate to the audio controls. Here, you can adjust settings to ensure sound output comfortably synchronizes with your VR visuals. For best results, set your TV audio to an appropriate level to match the immersive quality of the VR gameplay.
Using a Home Theater System
To elevate your VR viewing experience even further, linking your Meta Quest 2 to a home theater system is an excellent option. This setup can create a captivating environment where both sound and visuals come together. For this, ensure your home theater system has HDMI or Chromecast capabilities and connect them either wired or wirelessly, following similar steps from our previous sections. This multi-dimensional sound paired with your VR gameplay can significantly enhance your Meta Quest 2 experience.
Optimizing Gameplay Settings
For those who want to improve their gaming on Meta Quest 2 while using a TV, optimizing gameplay settings is essential. Ensure that your environment is free from obstructions that may affect tracking. Additionally, adjusting gameplay parameters such as brightness, contrast, and refresh rate can significantly augment your VR display quality, providing a rich and vivid visual narrative.
Conclusion
Connecting your Meta Quest 2 to a TV opens up a new dimension of virtual reality experience where you can enjoy gameplay together with family and friends. Whether you choose direct HDMI connections, Chromecast, or wireless screen mirroring, each method has its merits. Take the time to adjust video output and audio settings to enhance your experience, making the most of your Meta Quest 2 capabilities in a home entertainment setting.
FAQ
1. How do I troubleshoot Meta Quest 2 casting issues?
If you experience **Meta Quest 2 casting issues**, ensure that both your headset and casting device are connected to the same network. Restart both devices and check for software updates. Additionally, moving closer to your Wi-Fi router can help improve connection quality.
2. Can I use Meta Quest 2 with Apple TV?
Yes, you can cast Meta Quest 2 to Apple TV using AirServer or similar third-party casting options. Ensure both the headset and Apple TV are connected to the same Wi-Fi network. You can then follow standard Wi-Fi casting procedures to mirror your display.
3. What are the optimal video settings for TV viewing with Meta Quest 2?
For the best viewing experience while using **Meta Quest 2** on a TV, set your video output resolution to match your TV’s capabilities (e.g., 4K). This adjustment ensures you get the clearest visuals and experience immersive VR gaming as intended.
4. How do I adjust audio settings when connecting to a TV?
To adjust audio settings during your **Meta Quest 2 setup**, enter the audio controls from the settings menu. Ensure the output is set to your chosen audio device (e.g., TV speakers) and adjust volumes to avoid delays between audio and visuals.
5. What are the benefits of using Meta Quest 2 with TV?
Using the **Meta Quest 2** with a TV allows for a larger shared viewing experience, enhancing social interaction by letting others join in on the virtual world you’re exploring. It also allows for a more immersive experience with a bigger screen, making gameplay and content viewing more engaging.