Discover Effective Ways to Wax at Home in 2025 for Smooth Skin!
Waxing at home can be a convenient and cost-effective way to achieve smooth, hair-free skin. As we step into 2025, the techniques and products used for home waxing have evolved, making it easier for both beginners and seasoned waxers. This article will guide you through essential waxing tips, the best waxing techniques, and the necessary equipment needed for a successful wax at home. Whether you’re looking to wax your legs, underarms, or facial areas, we’ve got you covered!
Pre-Waxing Preparation
Before diving into the waxing process, proper **pre-waxing preparation** is crucial. To ensure a smooth experience, start by exfoliating your skin a day or two before waxing. This removes dead skin cells and helps prevent ingrown hairs. Use a gentle scrub or a chemical exfoliant, especially if you have sensitive skin. Alongside skin exfoliation, ensure your hair is the optimal length for waxing; ideally, it should be about a quarter of an inch long. This length helps the wax grip the hair better, providing better results. Don’t forget to choose the right wax, whether it’s **soft wax** or **hard wax**, based on your skin type and hair thickness.
Choosing the Right Wax
The first step in your waxing process is **choosing the right wax**. For beginners, soft wax might be easier to use, as it adheres well to the skin but keep in mind it requires strips for removal. On the other hand, hard wax is excellent for sensitive areas because it hardens on the skin and is removed without strips, minimizing pain. Assess your skin type and hair texture to select a wax that will work effectively without causing irritation.
Essential Waxing Tools
Having the right **waxing tools** makes a huge difference in your home waxing experience. Typically, you’ll need a wax warmer, spatulas for application, and strips if you’re using soft wax. Additionally, having after-waxing products, like soothing gels or oils, will help your skin recover smoother. Always ensure your tools are clean and sanitized to avoid any skin reactions or infections during the waxing process.
The Waxing Process: Step-by-Step Guide
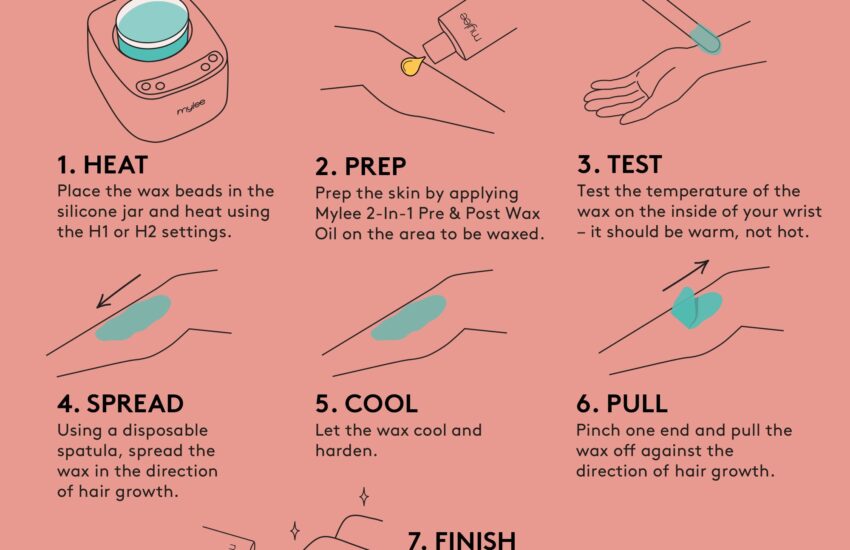
Now that you’ve prepared your skin and gathered your **waxing equipment**, it’s time to undergo the waxing process. Following the correct **waxing techniques** ensures not only effectiveness but also lower pain levels and better results. Here’s a step-by-step guide to help you wax at home successfully.
Step-by-Step Waxing Instructions
1. Start by warming the wax according to the manufacturer’s instructions. Test the wax on a small section of skin to ensure it’s not too hot.
2. Using a spatula, apply a thin layer of wax in the direction of hair growth. Be careful to cover the area entirely without overlapping too much.
3. If using soft wax, immediately place a strip over the wax and press down gently. For hard wax, wait until the wax hardens slightly but is still pliable.
4. Hold your skin taut with one hand, and with the other, quickly pull the strip or hard wax off in the opposite direction of hair growth. Keep it as parallel to the skin as possible to minimize pain.
5. Repeat for all desired areas, ensuring each waxed section is clean and smooth.
Waxing Myths and Realities
It’s important to debunk some common **waxing myths** before you start. Many believe that waxing must be incredibly painful, but with the right preparation and technique, it can be a manageable experience. Another myth is that soft wax is the only option; hard wax provides good results in sensitive areas without the need for strips. Understanding these aspects can help ease any anxiety related to home waxing and inform your approach for smoother results.
Post-Waxing Care
After you’ve completed the waxing process, the next step is **post-waxing care**. Proper care is essential to promote healing and maintain the smoothness of your skin. Clean the waxed area with a gentle, fragrance-free cleanser to remove any residue and prevent irritation.
After-Waxing Recommendations
Post-waxing, it’s advisable to apply a soothing lotion or cream containing ingredients like aloe vera. This can significantly improve skin recovery. Avoid activities that may irritate the skin, such as intense workouts, hot showers, or sun exposure for at least 24 hours after waxing. Also, refrain from using products that contain fragrances or harsh chemicals to prevent skin reactions during the healing phase.
Waxing Frequency
Understanding **waxing frequency** can enhance your overall experience. For most, a regular waxing schedule of every 4 to 6 weeks works best, but it can vary based on individual hair growth rates. Those needing a quicker hair removal solution might consider **facial waxing** every two to four weeks, especially around the eyebrows and upper lip. Consistent waxing can lead to finer regrowth over time, making your future sessions less painful and more efficient.
Benefits of Waxing at Home
Home waxing has several notable benefits, making it an attractive option for many. Not only is it cost-effective compared to regular visits to **waxing salons**, but it also allows for privacy and convenience. Here are a few more reasons why home waxing is a practical choice.
Cost-Effectiveness of DIY Waxing
One of the standout **waxing benefits** is the cost savings. Investing in an **at-home waxing kit** can be far less expensive than scheduling multiple salon visits. While the initial outlay for tools and wax may be high, these products yield numerous sessions, significantly reducing the overall maintenance cost over time.
Comfort and Convenience
Home waxing provides unparalleled comfort and convenience. You can choose when to wax without needing to schedule appointments, making it easy to fit into your lifestyle. Plus, it’s an opportunity to create a quiet, relaxed space with your preferred music, allowing for a more enjoyable experience as compared to a busy salon environment.
Key Takeaways
- Proper pre-waxing preparation and post-waxing care are crucial for successful results.
- Choosing the right wax and tools can improve your home waxing experience significantly.
- The waxing frequency should adapt to the areas you prefer to wax and your hair growth rate.
- Home waxing offers cost savings and convenience that salon waxing cannot match.
- Debunking common waxing myths can help alleviate any fears and facilitate a better experience.
FAQ
1. What are the best waxing techniques for sensitive skin?
When waxing sensitive skin, it’s best to use **hard wax**, which minimizes irritation. Also, incorporate soothing elements like aloe vera after waxing to help calm the skin. Always ensure to perform a patch test before full application to ensure no adverse reactions.
2. How long does waxing last?
Typically, waxing results in smooth skin that lasts anywhere from 3 to 6 weeks, depending on individual hair growth rates. Consistent waxing can make hair regrowth finer over time, extending the duration of smooth skin.
3. What common waxing mistakes should I avoid?
Avoid applying wax to dirty skin; ensure your area is clean and dry. Using too hot wax or applying it too thickly can lead to burns and irritation. Opt for medium thin layers and test the temperature beforehand.
4. Can I wax if I have sensitive skin?
Yes, many people with sensitive skin can wax successfully. Choosing the right wax, such as hard wax, and taking pre-wax precautions can minimize adverse reactions. Always follow up with soothing lotions to promote healing.
5. Is DIY waxing effective as professional waxing?
DIY waxing can be very effective and yield results comparable to professional waxing if done correctly. However, precision techniques and thorough knowledge of waxing practices can help achieve salon-like results at home with the right products and preparation.
With these guidelines and tips, you can confidently embark on your home waxing journey in 2025, achieving smooth skin with little fuss. Embrace self-care, explore what works best for you, and enjoy the benefits of waxing at home!