How to Create a ZIP File on Mac: A Comprehensive Guide
Creating a ZIP file on Mac can significantly enhance your file management efficiency and simplify sharing large documents. In this article, we will explore various methods on **how to create a ZIP file on Mac**, utilizing both built-in tools and third-party applications. Follow along to learn the best practices for **compressing files on Mac**, along with insightful tips and tricks.
Using Finder to ZIP Files on Mac
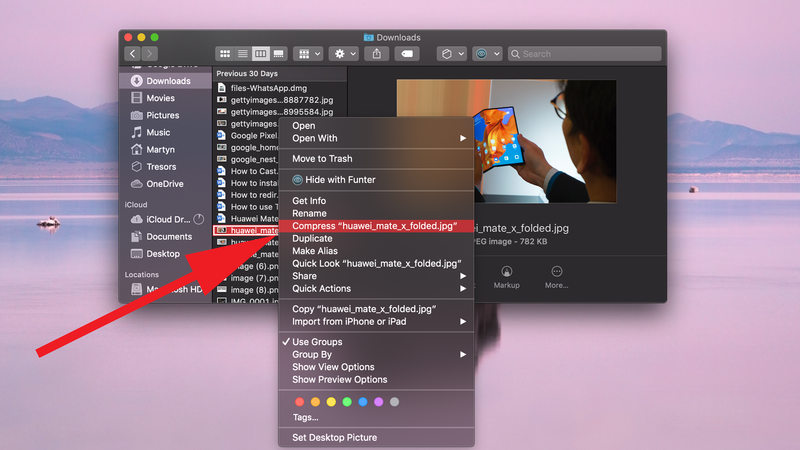
The most common way to **make a ZIP file on Mac** is through Finder, which offers a user-friendly interface for file management. This method is perfect for users who want to streamline their workflow without needing additional software. To get started, simply select the files or folder you wish to compress. Right-click (or control-click) on your selection and choose the option to **create a zip archive Mac**. The resulting ZIP file is created in the same directory as the original files, labeled as a “zipped folder Mac.” This simple process promotes organization and takes mere seconds.
Step-by-Step Instructions for ZIP File Creation
To ensure you follow the **zip file creation steps** accurately, here’s a detailed guide:
- Open **Finder** and navigate to the files or folder you want to compress.
- Select one or more files. To select multiple items, hold down the Command key while clicking.
- Right-click (or control-click) on your selection and choose **Compress** from the contextual menu.
- A new ZIP file will appear in the same location with the name of the original item(s).
This straightforward approach lets you quickly **compress folders on Mac** and combine multiple files into a single zipped file. This functionality is especially useful when preparing files for emailing or storage, ensuring you keep your data organized.
Advantages of Using Finder to ZIP Files
Using Finder to compress files comes with several advantages. It is an integral part of the **file management Mac** ecosystem, providing a seamless user experience with minimal hassle. Not only does **zipping files on Mac** reduce the overall size, but it also bundles related documents, making it easier to share. Zipped contents are also compatible with different operating systems, enhancing overall efficiency during file transfer or sharing sessions.
Creating ZIP Files Using Terminal Commands
If you are comfortable with command-line tools, the **zip command in Terminal Mac** offers a powerful alternative for compressing files and folders. This method may be preferable for advanced users who require more control and customization over the zipping process.
Terminal Commands for File Compression
To effectively **archive files on Mac** using Terminal, follow these steps:
- Open the **Terminal** application from your Utilities folder.
- Use the command
zip -r myarchive.zip /path/to/directory, replacing “myarchive.zip” with your desired file name, and “/path/to/directory” with the path to your target files. - Press Enter to execute the command. Your files will be compressed into the specified ZIP file.
This method allows you to **zip multiple files Mac** easily, even specifying additional options for compression settings. Terminal commands streamline your operations and cater perfectly to users familiar with scripting.
Customizing Your ZIP File with Terminal
Command-line options provide flexibility, enabling you to customize fees such as compression levels and exclude specific files. Techniques like integrating zip processes with other commands or automating zipping tasks through scripts can significantly enhance productivity. Always explore various **Mac utilities for zipping** files to boost your workflow further.
Best Practices for Zipping Files for Sharing on Mac
<pWhether you need to send large files via email or collaborate with others, knowing how to **zip files for sharing Mac** is crucial. Proper practices ensure your files don’t exceed limits while preserving their integrity during transit. Here's how you can achieve that.
Compressing Documents for Email
To **send zip files Mac** efficiently, ensure the total file size is manageable. Most email services have limits on attachments, so compressing your documents allows you to **reduce file size on Mac**. Simply use Finder or Terminal to pack your documents into a single ZIP file. Always test sending your ZIP file to ensure the recipients can easily access the contents, maintaining *file versioning with zip* if needed during collaborative projects.
Security Considerations for ZIP Files
When you share sensitive files, consider **zip file encryption**. Third-party applications can create password-protected ZIP files, safeguarding your information. This feature allows you to maintain confidentiality and protect your valuable data from unauthorized access.
Leveraging Third-Party Applications for Enhanced Zipping
If you often engage in file compression and management, exploring third-party applications is worthwhile. These specialized tools offer robust features, tailored for various use cases. They can optimize not only file compression but also data management workflows.
Popular ZIP Utilities for Mac
Applications like Keka, The Unarchiver, and WinZip provide advanced functionalities. Tools such as these can merge multiple files into one zip effortlessly, enabling easy organization and management. They might also incorporate additional features like file recovery options or converting between different ZIP file formats. Research each tool to find one that aligns with your needs for **file management Mac** efficiency.
Unzipping Files on Mac Effectively
After you compress files, learning **how to unzip files on Mac** is equally essential. Most, including Finder and built-in compression utilities, handle ZIP files seamlessly. Right-click on a ZIP file, select **Open**, and your files will be extracted without any adjustments necessary. Streamlining both zipping and unzipping ensures you can manage your data effectively, maximizing productivity.
Key Takeaways
- Utilize Finder for quick and straightforward zip file creation without additional tools.
- Explore command-line options in Terminal for advanced control over zipped files.
- Always consider file size and sharing methods, especially when emailing files directly.
- Integrate third-party apps to enhance functionality and manage complex file systems.
FAQ
1. What is the process of compressing images on Mac?
To **compress images Mac**, use Finder to select your images, then right-click and choose **Compress**. This will create a zipped folder of the images, effectively reducing file size for easier handling or sharing.
2. Can I create a self-extracting zip on Mac?
Yes, while Macs do not have built-in functionalities for self-extracting ZIP files, third-party tools may offer this feature. Check the app’s documentation for instructions on how to create these types of files.
3. How can I zip multiple files together on Mac?
Simply select multiple files while pressing Command and right-click, then choose **Compress** from the popup menu. This will package all selected files into one compressed ZIP file.
4. Are there any limit sizes for ZIP files on Mac?
Zip files have no specific size limit dictated by MacOS. However, practical limits are imposed by the service you use to share files. Factors like email attachment sizes could affect how large a ZIP file you can feasibly send.
5. How can I send zip files securely via email?
To maintain security when sending ZIP files, consider using password protection through third-party applications. Encrypting your ZIP file before sharing ensures your files remain secure against unauthorized access.